Hi everyone! I apologize for my long absence from the blog. Please forgive me as there has been so much going on lately. So, today I would like to share with you how to make a simple baby blanket.
1. Now, when choosing your fabric you are going to want to make sure that it is soft and the colors and designs match.
2. You are going to need 2 yards of fabric, as well as thread that matches your color scheme.
3. When you cut your fabric you want to make sure that your two pieces are the same size, but don't stress too much about the edges. A recommended size is about 30 by 35 inches.
4. You are going to want to make sure that the fabric is inside out when you are sewing around the edges. When completing the sewing you can do it by hand or with a machine. This sewing is simple, and there is little room for error.
5. Make sure to leave a gap so when you are done sewing you are able to flip the blanket right side out.
6. Make sure that there are no pieces of excess fabric, and if there are you can carefully cut them off.
7. Now if you would like you can add details...
- A nice border design.
- Cute cut-outs.
- Sew a nice design around the edges if you have some left over matching string.
8. Double check for any stray strings or fabric, then you are done!
I hope you will all enjoy making these simple crafts. They will be a great help to our little miracles that God gives us...
"I fell the greatest destroyer of peace today is abortion because it is a war against the child. A direct killing of the innocent child, murder by the mother herself. And if we can accept that a mother can kill even her own child, how can we tell other people not to kill one another?"
- St. Mother Teresa of Calcutta
In Mamma Maria,
Kristi
Saturday, May 26, 2018

Monday, February 26, 2018
1st Mail-in Is Finished!
1st Mail-in Is Finished!
First of all, I want to thank everyone that contributed to this mail-in. I have received so many lovely items that I am sure will help a new mother and her baby feel very special. I have taken pictures of all the lovely projects and will be sending them to my local crisis pregnancy center very soon!
 |
| All of the lovely things we received this month! |

The skill in these dainty booties is amazing, something I am still aspiring to! I love how delicate they are.

These beanies are so unique with all their different textures and styles, as well as the sweet pom-poms!
 |
| A close-up of some lovely quilts that were left over from previous pro-life projects. My mom helped me out with these, and I think they came out quite nice. |
The Next mail-in will be coming up at the end of March, so start stocking up on your baby items now!
Thank you again for contributing!
God bless, Magda
Tuesday, February 6, 2018
Share on Social Media!
Spread the word! Life is precious! BE an advocate! Sometimes it just takes one Facebook post, one tweet, one message to ignite a flame.


Thursday, January 25, 2018
Mail-in update
Hi everyone!
I hope that your month is going well. Just a reminder, the mail-in is drawing to a close, so be sure and finish your projects and get them into me by next month. I will be posting pictures of all of the beautiful projects.
God bless, Magda
I hope that your month is going well. Just a reminder, the mail-in is drawing to a close, so be sure and finish your projects and get them into me by next month. I will be posting pictures of all of the beautiful projects.
God bless, Magda
Sunday, January 14, 2018
Simple Homemade Baby Items; Headbands

Hello Everyone!
I hope that you are all doing well, and I am here today with some ideas and my very own patterns to share with all of you that crochet so that you don't get stuck in a crafting rut as you hook your baby items.
Baby hats are so cute, and they come in endless shapes and patterns, but whenever I get sick of Baby beanies I turn instead to baby headbands! I like to make them thick and soft in sweet colors to help our little ones feel warm and look stylish.
Baby headbands are as easily customizable as hats, so be sure and give them a try to help a little one feel how special they are!

Baby Girl Headband
For this headband I used
Super Bulky Lion Brand Hometown USA in Providence Pink.
Size J, 6 mm crochet hook
A wooden button
Stitches
sc; Single crochet
ch; Chain stitch
slst; Slip stitch
Fsc; Foundation single crochet
bp; back post
Row 1; Ch 2, 32 fsc, join into a loop with a slst, making sure that the ring is not twisted.
Row 2; ch 1 (does not count as a stitch now and through out), 11 bpsc, ch 12, skip 10 st, 11 sc. Do not join
Row 3; repeat Row 2 at least once, but for a very thick headband repeat twice.
Row 4; 11 bpsc, ch 6, bunch all of the chains together by working 2 sc into 5th skipped fsc, ch 6 and skip the rest of the ch from previous row, 11 sc.
Fasten off
Sew a wooden button securely onto the 2 long sc worked, on the center of the bow inset.
Viola! A sweet little bow headband that will keep the newborn girl all snuggly and warm!

Variation; complete Row 1 as above, but on Rows 2-4 bpsc all around. Finish by stitching a button, flower, or applique on the headband.
 Baby Boy Headband
For this headband I used
Super Bulky Lion Brand Hometown USA in Charlotte Blue.
Size J, 6 mm crochet hook
A wooden button
Stitches
sc; Single crochet
ch; Chain stitch
slst; Slip stitch
Fsc; Foundation single crochet
bp; Back post
 Row 1; Ch 2, 32 fsc, join into a loop with a slst but twist one end of the work by half a turn, joining the bottom of the first row to the top of the row.
Row 2; Ch 1, sc all around (because of the twist you will end up adding two rows in this step, but it will be continuous). Fasten off
Position the headband so that the twist occurs at the join seam (the row beginning and end) Sew a wooden button securely onto the twist, sewing through all the layers.
Tada! A cute ear-warmer that would make any baby boy proud.
I hope that these patterns were easy to follow, let me know if you have any questions in the comments section below.
God bless, Magda

Baby Girl Headband
For this headband I used
Super Bulky Lion Brand Hometown USA in Providence Pink.
Size J, 6 mm crochet hook
A wooden button
Stitches
sc; Single crochet
ch; Chain stitch
slst; Slip stitch
Fsc; Foundation single crochet
bp; back post
Row 1; Ch 2, 32 fsc, join into a loop with a slst, making sure that the ring is not twisted.
Row 2; ch 1 (does not count as a stitch now and through out), 11 bpsc, ch 12, skip 10 st, 11 sc. Do not join
Row 3; repeat Row 2 at least once, but for a very thick headband repeat twice.
Row 4; 11 bpsc, ch 6, bunch all of the chains together by working 2 sc into 5th skipped fsc, ch 6 and skip the rest of the ch from previous row, 11 sc.
Fasten off
Sew a wooden button securely onto the 2 long sc worked, on the center of the bow inset.
Viola! A sweet little bow headband that will keep the newborn girl all snuggly and warm!

Variation; complete Row 1 as above, but on Rows 2-4 bpsc all around. Finish by stitching a button, flower, or applique on the headband.

For this headband I used
Super Bulky Lion Brand Hometown USA in Charlotte Blue.
Size J, 6 mm crochet hook
A wooden button
Stitches
sc; Single crochet
ch; Chain stitch
slst; Slip stitch
Fsc; Foundation single crochet
bp; Back post
 Row 1; Ch 2, 32 fsc, join into a loop with a slst but twist one end of the work by half a turn, joining the bottom of the first row to the top of the row.
Row 2; Ch 1, sc all around (because of the twist you will end up adding two rows in this step, but it will be continuous). Fasten off
Position the headband so that the twist occurs at the join seam (the row beginning and end) Sew a wooden button securely onto the twist, sewing through all the layers.
Tada! A cute ear-warmer that would make any baby boy proud.
I hope that these patterns were easy to follow, let me know if you have any questions in the comments section below.
God bless, Magda
Friday, January 5, 2018
Simple Homemade Baby items; Crochet Appliques
Hello Everyone.
If you are like me and sometimes have a hard time with how long a project can take or you get easily distracted from current projects, but you still want to contribute homemade baby items, then I might have the solution to your problems!


Appliques!
Appliques are flat images that you sew onto fabric. You can buy some from the store, but you can also make lovely ones yourself.
Super fast and easy, so customization, and very unique appliques can take a simple white baby onsie and transform it into something to cute for words! What I will suggest that you do is go and buy several solid color baby onsies from a store and then start hooking custom appliques and attach them to each one. You can mix and match cute appliques, add embroidery, and maybe even add a cute little pocket.
Below I have linked to youtube tutorials that I hope will help inspire you to make your very own appliques!
A Pretty Elephant Applique For Kids - DIY Crafts Tutorial - Guidecentral
Such a cute pattern, and changing up the colors makes it appropriate for either a girl or a boy!
Very simple, and I like the idea of making several in different colors with embroidered waves.
There is only one word to describe this applique... Adorable! I think this is my favorite of the bunch!
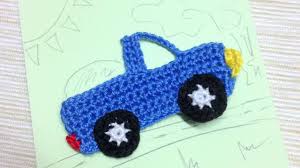
Crocheted Pick-Up Truck Applique - DIY Crafts Tutorial - Guidecentral
This is a very sweet little truck for a baby boy. It looks so nice, and the proportions are great!
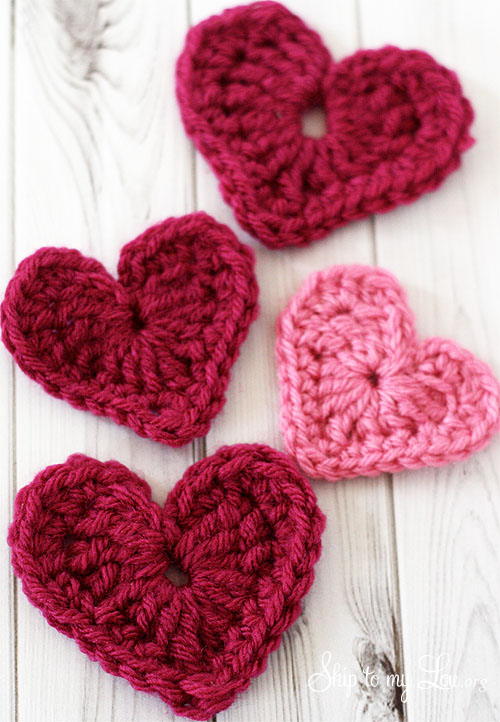
How to Crochet a HEART (small size) ♥ CROCHET LOVERS
And finally, the quintessential applique, a heart. It is hard to find a heart pattern that has such a well defined point, so I thought that this is one of the best heart tutorials out there.
Crocheted Pick-Up Truck Applique - DIY Crafts Tutorial - Guidecentral
This is a very sweet little truck for a baby boy. It looks so nice, and the proportions are great!
How to Crochet a HEART (small size) ♥ CROCHET LOVERS
And finally, the quintessential applique, a heart. It is hard to find a heart pattern that has such a well defined point, so I thought that this is one of the best heart tutorials out there.
Sewing Applique's on Crochet Pieces Invisibly
This excellent tutorial will show you how to securely stitch your appliques on fabric so that you can not see the join. If course, if your applique itself is simple, a visible whip stitch is a nice option as well.
And that is it! There are so many applique options out there, and it is a great way to dress up a simple item and add a homemade touch.
I hope this helps!
God Bless, Magda
And that is it! There are so many applique options out there, and it is a great way to dress up a simple item and add a homemade touch.
I hope this helps!
God Bless, Magda
Tuesday, December 26, 2017
The Life App
Hi everyone! I hope that you all had a lovely Christmas! I have found a free Pro Life app for iPhones and iPads! It is called The Life App. The Life App is an app that will help you respond to crisis pregnancy situations by showing you how to use empathy and love towards women in a crisis pregnancy situation, how to respond to these women, and the perspective of women in these situations. The Life App also has information on FOCUS (The Fellowship of Catholic University Students) and the Sisters of Life. This app is a great opportunity!
God Bless,
Kristi
Subscribe to:
Posts (Atom)